Fencework
One reason most clubs invest in a more permanant facility is due to the amount of effort in erecting a backstop before every game and training session, and then taking it down again afterwards. Not that it is necessarily that hard, especially if you use one of the Pop-up nets; but having to do this EVERY time and also drag it up from whereever it is stored, does become tiresome.
Backstop Height
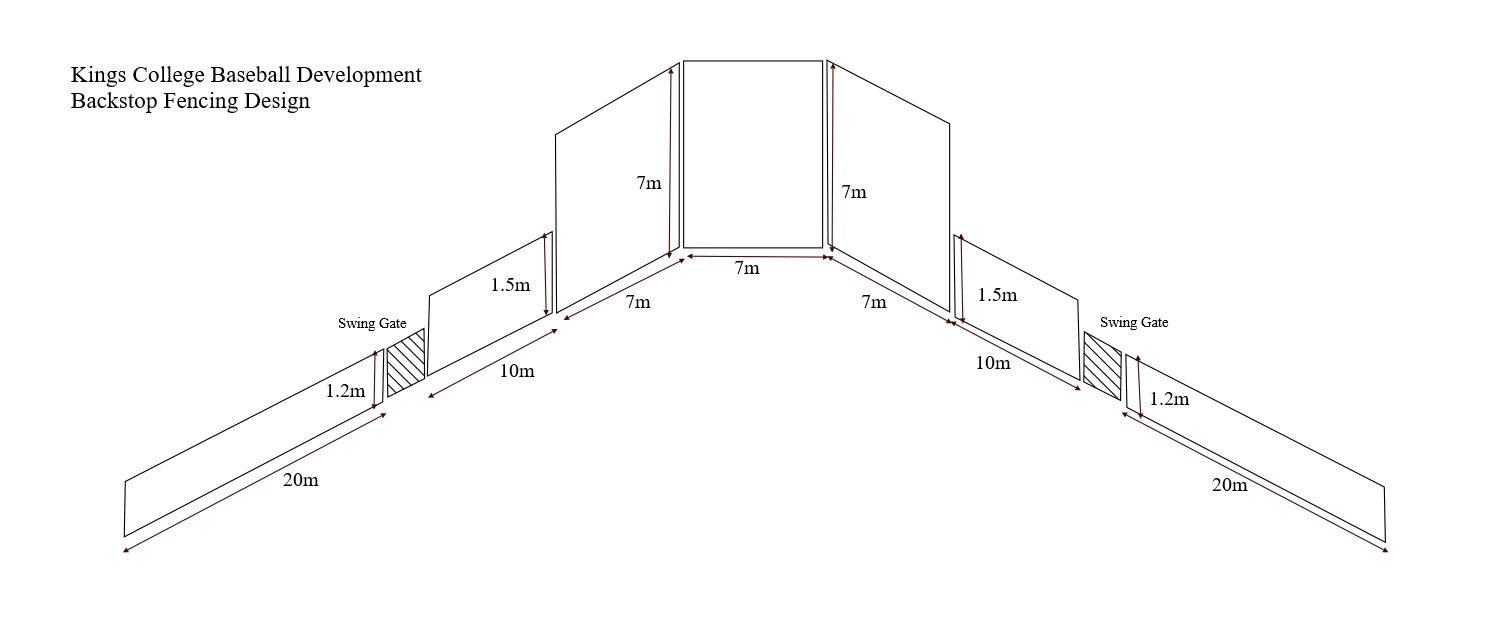
Anorther reason for a more permanant structure, is that it can be higher than the temporary ones, and most baseballs that travel far and/or get lost behind the backstop, are usually those that travel at lower trajectories. Hence a backstop that is a minimum of 4m high is really needed, and if you can get to 6m or 7m, then that can make quite a difference. Obviosuly it also depends on how far behind home plate, the fence is. The effective difference between a backstop 45 ft from home plate and one 60 ft from home plate, is that the nearer one is effectively 7 ft higher. So although 60m may be the official distance, not only is that a very severe penalty on catchers / pitchers at lower levels, it also makes the backstop effectiely lower. Hence the reason we went for 45 ft from the back of home plate to fence. We then added wings to this, to extend the backstop parallel to the foul lines. First of all, we had 1.8 m sections, each with a swing gate on the end, and then 1.2 m sections
 Width of Backstop
We went with a design of 3 panels in the middle, that were each 7m by 7.5m, with an approx angle of 120 degrees, between the middle one that was parallel to the front of home plate, with the two wings angled in towards the foul lines. After this, we had two mid height sections that were 10m each either side of the 3 main panels, and 1.8m in height. The thinking is that the teams would sit behind these and be protected from foul balls. The final sections were waist high at 1.2m, which could be comfortably lent on, and gives some protection to some sitting in chairs, although we would still advise people to be aware of foul balls. The length of these final sections, is a matter of choice. We extended as far as 1B and 3B on each side, but further is always better, although of course adds more to the cost.
Suppliers
Who do you get to build your fence? There are plenty of suppliers of MUGA (multi use games area) fencing, although a bit harder to find ones that can supply what we need for baseball (although in theory, all should be able to). We came across the following suppliers, all of whom were able to provide quotes
- Tate & Tonbridge (as recommended by Kent Bucs, and who we ended up using)
- Alpha Fencing
- Zaun Fencing
- Jacksons fencing
Obviously availbility as to when they can do it, might be an issue, and we would advise getting at least 3 quotes so you have a comparison, since this will be the most expensive part of your project. It makes sense to put together a basic requirements document that you can send to them, so that they can easily provide a quote. This example is what we started with.
Kings College – Backstop Requirements
Backstop Work
In some ways this is the easiest part of the project, as it must be carried out by the suppliers, and their cost will include installation. There are however, still some issues you may come across and/or lessons we have learnt from this
- Does the landowner, allow vehicle access on the field, especially at the time of year when the fence is usually being installed i.e. off season. Our school wouldn’t let heavy machinery on the field, although fortunately the supplier had come across this before and was exepecting to hand drill the holes for the poles
- Where is the field drainage? It is worth getting a plan, as you don’t want the holes for the poles to be drilled though drainage pipes obviously
- When is the site accessible. We had a school, and thus had to plan to have the work during school holidays. Foruntely it only took about 4 days to install from start to end, so this was easy to accomodate. That said, weather does have some potential to interupt this.
- Expect to tell the suppliers exactly where posts and thus the fence should go. Don’t assume the plan you sent them will be sufficient
- Decide which way you want the gates to open (probably doesn’t really matter, except when you are put on the spot, and hadn’t considered it before!)
Sections
Costs (as of 2021/22)


